
DIY | Tips | Lists
Do I need to bleach? | The most common question I get about hair coloring
March 21, 2021 • DIY | Tips | Lists, Hairventure
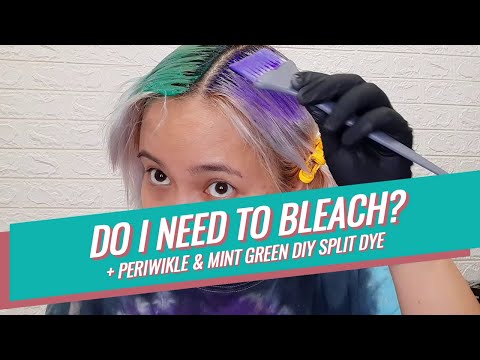
Since I started hair coloring, this is probably the most common question I get asked. Here's 15min long video of me explaining why it is a must when you want vibrant colors to show up on your mane! Enjoy!
Maintining Blonde Hair | How I Tone My Hair
November 05, 2018 • DIY | Tips | Lists, Hairventure

DISCLAIMER: I AM NO EXPERT or PROFESSIONAL. Everything you see or will see in this blog about my #hairventure is based solely on personal experience.
When I started bleaching my hair years ago, I always end up so frustrated because I couldn't get to the platinum blonde state (Level 9-10) I always wanted. I would always end up with a corn-rust blonde that I sometimes love, but hate most of the time.
Instead of aiming for that platinum blonde hair, I'd just end up choosing a darker color (again) to cover up the brassiness. And I would always envy those that could get it done at the salon because I never had that kind of budget.
BUT, given today's hair technology evolution, platinum blonde (and silver, gray, ash hair) is easier to achieve not only in salons, but also in the comfort of your own home! DIY!
HOW? TONING PEOPLE! TONING!
Turns out, it's not only our face that needs toning. Hair needs it too! If you want to achieve that light blonde hair. Toning is the way to getting rid of all tacky muddy yellow tones, post bleaching.
So, what is toning? According to bellatory.com,
Toner is a sweet little product that neutralizes brassy yellow and orange tones on bleached hair. It is usually purple-blue tinted. When applied to bleached hair, it takes it to more of an ashy, dusty, or platinum color. That means a much more natural-looking hair tone! It can also make your hair look shiner and healthier.There are a lot of toners now in the market, but I'll discuss the few ones I've already tried and what I love and hate about them.
1) Wella Colar Charm Toner

Before using this, you may want to do research first which variant should be used for your current blonde shade. If what you are using is a bit darker than its requirement, it may not work.

When mixed right and applied on the correct shade, it works wonders and works fast. Although, I am not a fan of the stingy feel it gives, like when you're bleaching or using a really high volume developer.
REMEMBER: Do your research! Don't just dive in because it's a really strong concoction.
When mixed right and applied on the correct shade, it works wonders and works fast. Although, I am not a fan of the stingy feel it gives, like when you're bleaching or using a really high volume developer.
REMEMBER: Do your research! Don't just dive in because it's a really strong concoction.
2) Purple Shampoo & Conditioner
These two are a match made in heaven! It is a perfect combination made for every chemically treated blonde head. As I shared earlier, purple tones are used to neutralize the brassiness of the hair, so that in itself is self explanatory why Purple Shampoos and Conditioners are the best way to maintain blondes and grays.
There are imported purple shampoos like this from Generic Value Products (GVP), but I personally prefer using local ones like the ones from Beach Born and other local brands from Shopee.
 |
| www.beachborn.ph |
I love everything about this combo, except for the part where Purple Shampoos tend to dry your hair a bit so it should be used moderately. Using it 2-3x a week should be okay and should keep the brassy tones away.
2) FAVORITE: Purple Keratin

This is my ABSOLUTE FAVORITE and my current holy grail! My toiletry basket simply isn't complete without this. Everybody has been asking if i kept bleaching my hair to get the white its come to, but no. It's just this pretty thing right here. The power of purple shampoo, but with the conditioning powers of keratin! And everybody who does DIY hair coloring knows that keratin is your bestfriend!
I found this gem on one of my usual "let's find the cheapest option on Shopee" days. This kawaii themed shop (https://shopee.ph/melanchelly) sells this 500ml bottle for P288! And this lasted me 3 months!
I love everything about this product only sometimes, it's so potent that it stains your hair violet. However, you need not worry! You just need to mix it with a little bit of white conditioner and voila! You're all set!
~
That's it! Care to share any of your toning routine? Comment below!
How I Removed Red Color on my Hair for P299!
October 02, 2018 • DIY | Tips | Lists, Hairventure

Remember when I shared my bleaching the red hair experience and it just turned peach pink-ish? Told ya'll I was going to find a way how to remove the remaining color... Well, I've finally figured out how to clear my hair of all the stubborn red/orange pigments!
Just to make it clear, I'll be sharing 3 things that I did to my hair to reach the almost platinum blonde shade it is in now. If you have red, orange or pink hair and would like to have it remove before jumping into another color, then read on!
DISCLAIMER: I AM NO EXPERT or PROFESSIONAL. Everything you see or will see in this blog about my #hairventure is based solely on personal experience.
1) DIY Concuctions
After bleaching my red hair, it went dry -- OF COURSE. So, I needed to have it rest before I go full on chemical warfare with it again. I searched for natural ways on how to (gradually) remove the color from my hair and I found two (2) that were quite effective.
(A) Anti-Dandruff Shampoo + Baking Soda
When you have color treated hair, you are advised not to use any anti-dandruff shampoo since an ingredient present in anti-dandruff shampoo strips away the color faster. Add an equal part of baking soda, which is natural ingredient used in cleaning almost all kinds of stuff --- You get an easy and somewhat natural color remover for your hair. I used this formula for about a week with my regular conditioner. Change is very gradual, but it works and is perfect if you're not in a hurry.
(B) Dishwashing Soap + Baking Soda

I know this is weird and not to mention makes your hair smell a little funny after, but it's not all bad. Mix equal parts dishwashing liquid and baking soda. Shampoo as normal. As you rinse, you'll see a bit of color down the drain. Although, this method might also need a few washes.
2) The (mild) Bleach + Shampoo Treatment
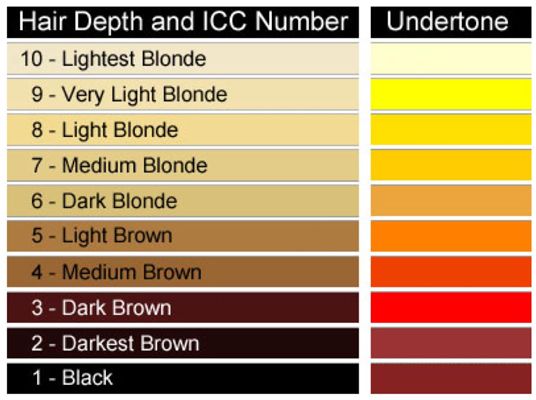
About a week into it, my hair somewhat returned to its natural soft state or at least to a state where it can handle a little bit of bleaching again. I mixed about 10-15grams of bleaching powder and 9% oxidizing lotion. After, I added in equal part shampoo. I just used my regular shampoo for this, but I read in a blog that using a clarifying shampoo does a better job. I used this every other day until my hair became about Level 8 blonde near the roots and Level 4-5 towards the end.

3) Full Chemical Treatment: Hair Color Erase
I knew there are several hair color removers in the market, but they're too expensive (for me) that I really tried the first 2 ways first since they're cheap and I already have them. But, I was getting impatient from removing all the dark tones that I finally decided I'd spend P500 - P900 for a hair color remover. Still, I was hoping against hope that I'd find something that is within my budget, and thank the online shopping gods, I DID! I found this shop on Shopee that sells repacks or "takals" of expensive hair stuff.

I purchased this 15grams repack of Matrix Essentials Solutionist Color Erase Permanent Hair Color Remover for P299! I just purchased one set since I only had shoulder length hair and would only need to remove color on the bottom half of my hair. The set includes a repacked powder form color erase, 100ml of oxidizing lotion and very precise instructions on how to use it. It looks like and has the same process as bleach, but it does not bleach the hair. It will only remove the current color and bring it back to the original state it was in. For me however, since I already bleached my hair before this, my hair instantly went from muddy orange to Level 8-9 blonde.

A little warning though to those who would like to try it --- IT WILL DRY YOUR HAIR. I was kind of shocked as to how dry it became after the color removal. It was more fried than when I bleached 2x in a week! It is very effective and it really does what it's supposed to do, but you have to be prepared for a lot of conditioning treatments after. Before using this, I would advise to stock up on Keratin treatments and deep conditioners.

Nevertheless, if you want it fast (because you are impatient like me) I would strongly recommend this! Just remember to condition A LOT and as always, never forget the holy grail of all Hair DIYers --- Virgin Coconut Oil. I also used my favorite Purple Keratin to remove the brassiness left after all the bleaching and color removing.


If you plan to try this product out, or any hair color removers/routines, share them on the comments below! I would love to hear them or maybe even try them out too!
PS. don't forget to follow me on Instagram and checkout my #hairventure highlights!
How I Bleach My Hair
September 22, 2018 • DIY | Tips | Lists, Hairventure

AND as promised! I'm gonna be sharing how DIY my hair color, bleach and everything in between! But, before I go ahead and start rambling, don't forget to follow me on Instagram and checkout my #hairventure highlights!
DISCLAIMER: I AM NO EXPERT or PROFESSIONAL. Everything you see or will see in this blog about my #hairventure is based solely on personal experience.
ALSO, before I started bleaching my hair I came from being a red head. Red pigments are hardest to remove and I knew it won't come off with the bleach, but yeah, I was excited :P
If you've known me for a long time you would know that if there is any part of my body where I really spend on, it's my hair and always the hair. I've always been fond and obsessed with coloring my hair, but of course while I was having fun, my wallet was suffering.
And so, with the help of my Mom from years back, we both learned the art of DIY hair care and coloring. It's been years since mom went on to the other side and I haven't colored my hair (loud) since then. Going back to it now is so meaningful to me that I just want to share what I learned from before and now to everyone.
(Wish you were still here, Mommy)
Back to the title of this post --- How I Bleach My Hair. While this process is already common, I know some people who are still afraid to do it because everybody knows it fries your hair. Specially if you don't know how to do it correctly. A few years back, I remember my hair felt like a broom from too much bleaching!
For first timers, I would always suggest having this done at the salon or with experts. If you are on a budget however, I know the first thing that would come to mind is doing it on your own or with a friend. Now, before you start hoarding stuff to bleach and color your hair, make sure you read through this post to see how I do it with as minimal hair damage and and as cheap as possible.
1) Believe in the power of VIRGIN COCONUT OIL (VCO)
A lot of people ask me how is my hair is still manageable after all the bleaching and coloring. This is the answer. Before I bleach my hair, I soak my hair in warm Virgin Coconut Oil. If your VCO is in a bottle, just heat water and put the bottle and the warm water in a cup to or you can just pop just enough amount for your hair in the microwave.
How long I soak it in VCO depends on my schedule, but it is advisable to soak it in for at least 5-6 hours or more. When I am on my lazy days, I soak it overnight and bleach when I wake up in the morning. NO WASHING.
2) Tools for Bleaching
Now, bleach is a very powerful compound and so is the oxidizing lotion/cream we use to mix it so we need to make sure we are well equipped! You will need a plastic mixing bowl, applicator (with or without comb), a towel or a robe and gloves. These four items are a must! If you have the budget, you can also go and invest on ear covers and some salon clips to help in sectioning your hair.
3) Bleaching Materials
Now the bleach! I used to by my bleaching powder in large tubs, but since I stopped and is just starting again, I buy mine in repacks and just enough to cover the length of my hair now. Good bleaching powders are light blue in color. I don't trust the ones that are white because, in my experience, they stink and are a waste of money -- it doesn't work for me. Anyway, along with the powder is the oxidizer (9%) to make it into a mixture. I got my Keratin Oxidizer from @pimpmyhairph --- this is the best oxidizer I've tried since it doesn't make my hair too dry.
3) Mixing the bleach and oxidizer
I have short hair now. I use about 30 grams of bleaching powder and mix it with 100ml 9% Oxidizing Lotion. What you're supposed to have is a light blue mixture with just the right amount of thickness.
4) Sectioning The Hair


4) Sectioning The Hair
I do quadrants when sectioning my hair and I bleach by section, starting with the ones in front onto the back ones. You can use hair ties or salon clips to do this.
5) Applying the Bleach

5) Applying the Bleach
As I said, I bleach one section at a time. Remember to start bleaching your hair at least an inch away from the roots since the roots tend to lighten faster than the rest of the hair strand. After bleaching the your hair, then you can start with the roots. After applying all the bleach, I massage the bleach a bit on my head to make sure I got it all covered.
6) Waiting Time
Waiting time depends on how light you want you hair to be, BUT REMEMBER do not go over an hour! Any bleach or hair color just stops working after an hour. Also, don't make your hair suffer that much. Since I need a lighter base for all the coloring I'm planning to do in the future, I let it sit for 45mins.
7) Rinse & Condition

7) Rinse & Condition
When rinsing, I make sure that I got all the bleach out. Dried bleach on your head will irritate your skin more. Your scalp has suffered enough during the bleaching process so make sure your you've washed out all the bleach. After which, I shampoo with my regular shampoo and CONDITION!
As I said, I came from a red hair before bleaching and so the bleach only lightened my roots and made my red hair a cute shade of peach pink ---- which was something I did not expect, but I love it.
Well, there you go... I hope you learned a thing or two about bleaching your hair. Remember, if you're not sure -- GO TO THE SALON! Or, if you're as obsessed as I am with DIY hair stuff, share with me your bleaching/coloring routine too!
PS. I'm still trying to figure out how to remove ALL the red pigments on my hair. Will share it here on the blog when I get it. :P
Cop That 90's Look: Where to shop!
May 20, 2018 • 90's, DIY | Tips | Lists, Fashion, Round Up, Style

Everybody (and we mean everybody) wanted to get their hands on some of that sweet, sweet 90s look when Bruno Mars and Cardi B lit up the stage for the 2018 Grammys. We don't blame you, though.

What makes the style crazy good isn't just because it's vibrant, colorful, and two of the best artists in the hip hop industry are wearing it, but because it pays homage to a classic 90s show: In Living Color.
Starring Jamie Foxx, Marlon Wayans, Jennifer Lopez, and Jim Carrey, Mars tweeted once before that it was one of his all-time favorite shows growing up—and who can blame him?

In fact, Mars loved the show so much that his ode to the show stretched beyond the fabric. Finesse was shot in the then-standard 4:3 ratio, instead of today's widely used 16:9 (widescreen). And if we haven't mentioned it yet, Cardi B also jumped in on the trend with her own look to compliment the performance:

Fortunately for us, much of the style during the 90s is making a huge comeback, and the supply & demand is holding. So if you're looking to start dripping in finesse, you've come to the right place! We've rounded up a few places where you can score your very own version of that living color fashion. And the best part? These shops won't break the bank.
Before we start going ham on the "add to cart" buttons on our trusty shops, let's go over the basics first: For the gents, Bruno Mars:

And for the ladies, Cardi B:

Now that you're all set and have taken these pointers from the masters themselves, let's take a look at where we'll be stopping and shopping.
Striped shirts: 90s Kids PH

90s Kids PH sells a respectable line of good quality striped t-shirts, ringer t's, and boyfriend shirts. Prices range from ₱150 to ₱400 depending on the type of shirt, and they do shipping and meet-ups! To see more of their designs, prices, and sizing, check out their Instagram and Shopee page. They also have a sunnies and specs shop where you can get your own 90s colored lens glasses.
Printed long sleeves and crewnecks: Poly Toly Owie

PolyTolyOwie is jam-packed with 90s designs. These guys sell custom t-shirts, tie dyes, crewnecks, and hoodies that range from ₱250 to ₱800 depending on your design and type of shirt. You can check out this Instagram page for orders and this one for designs and sizes. They also have a Facebook page, Viber (+63 906 804 6954), and SMS (+639565748808) if you want to talk to them about shipping.
Gold chains and hoop earrings: MNL Gold

MNG Gold sells all sorts of gold jewelry, from basic chains to necklaces with intricate designs, as well as rings, bracelets, and earrings. Keep yourself loaded since this'll be the most expensive part in the 90s fashion as prices start around ₱800 and can go well over ₱1,000. Follow their Instagram page and send them a DM or reach them through Viber (+63 915 662 5974) for inquiries and orders. They accept deposits at BDO, BPI, and can also do money remittance and cash on delivery. *Bling bling*
Caps and bucket hats: Reckless Few PH

Reckless Few PH has quite a few options you might want, so take a look at their Instagram page and see what hey have to offer. Price varies between products, but it's safe to say that it's around the ₱300~₱350 range, so take a look around and see what matches your style! If you want to see the designs yourself, head on over to Empire Maginhawa to see the store, or message them on Viber/SMS (+63 917 112 7311) for orders or inquiries.
Crop tops: COPPER

Shopcopper is every girl's one stop shop. With new arrivals that come by almost weekly, this online store stocks up on a wide selection of clothes. Still based on the 90s fashion trend, you'll find retro pieces ranging from crop tops and denims to leather jackets and plaid shirts—and a lot more! For more ideas on their designs, head on over to their Instagram page, and then to their website to see the prices. Prices range from ₱400~₱1,300, so save up if you want to get the (really) good stuff!
Jackets, windbreakers, and button downs: Retrograde PH

Boys, you better line yourselves up for this one. Retrograde PH is the absolute place to be to get anything from the southern Chicago's fashion to the windy city of Miami's floral print designs. If you take a quick visit to their Instagram page, you'll see that their items range from button down short-sleeved shirts to authentic couture merch—but for a price. Floral print button downs start at ₱550 a piece, but if you want to score those sweet Prada Windbreakers and Tommy Hilfiger originals, you'll have to start bidding. Some even go up as far as ₱3,800 for a deal! So for this one, save up if you want to score those American dreams.
High socks: Sockhouse MNL

The name speaks for itself! Sockhouse MNL is the place to be for all things under your feet. They sell all different kinds of designs for socks, and we're sure that there's at least one pair here to fit your 90s needs. Be patient with their Instagram page, though, because it's private and Sockhouse takes a while to accept follow requests. However, if you're keen on checking out most of their designs for yourself, they have several physical stores around Quezon City and Pasay.
So what are you waiting for? It's time to go shopping!
*This [original] article was originally published in RoundUp.PH
Shop Tick Tock It's Locked on Fundr
December 13, 2017 • DIY | Tips | Lists, Fundr, Products, Shirt Printing

Nawala na naman ako sa internet world lately, guys. Sorry. I've been super stressed out with finances and a bit overworked since you know, BER months is kill yourself month in the advertising world. Not complaining though --- just making that clear. Just saying this because I want to share something I do to destress (apart from binge watching K-Dramas ANNNDD Chinese Dramas --- I found a super cute series, I'll share it with you next time)
Anyway, one of the things I do to destress and break away from all the corporate slavery is look at some stuff I love and like in the internet or just anywhere then make them into something I can put in shirts. I know, it's not that original, but I do this mostly because I'm a shirt kind of girl, but I can't find shirts that I actually like (in the PH, at least) So, what I normally do is make them myself. I do a bit of tweaking and bring them to the nearest shirt heat press while you wait station. As we all know, heat pressed prints breaks and chips of in time and a single shirt can't actually go under the silkscreen process, because HELLO isa lang yun, hindi tayo mayaman.
As I did my research on what other options I can use, I came across this really cool website, Fundr by Custom Thread. This website became the solution to my shirt printing problem and more! The likes of it are already famous and widely used abroad, but they're the first one I saw doing it here in the PH.
I'm not sure how long Fundr has been in the business but they've already worked with local bands like Kwjan, Ransom Collective and Callalily. Aside from that, they print your designs on 100% cotton shirts and use direct to garment (DTG) printing. Not only do they make your shirt for you, they also give you an avenue to sell your shirts in their marketplace! Super cool nito guys.
One day, I was just planning to destress and make myself a couple of shirts and voila! Instant business for me too!

The website is very east to navigate and gives you a lot of guidelines and options too! This is super perfect for work at home parents, bloggers, freelance artists, etc. Fundr removes the hassle of managing an online shop by doing all the production and shipping them out for you. All you have to do is create your design and upload it to your Fundr page.
Check out their website to find out more and start your own Fundr Shop! And while in the process of checking out their site and making a decision whether you'd want to try them out, check out my fundr page too --- see that SHOP TICK TOCK ITS LOCKED button on the blog side bar --- Just click and start shopping!
Subscribe to:
Posts (Atom)


Social Icons